Synthetic Dataset using Blender+Python: Part 2
Rendering the dataset

Now that we are comfortable with the Blender starters, we can start using Python to automate some of its aspects and generate a synthetic dataset.
Pre-requisites:
I will be using Ubuntu 20.01 and Blender 2.91.
Objective:
To generate a dataset using Blender and Python, with the characteristics:
- Assume our object is centered at the origin (0,0,0)
- Capture the object from a particular distance (R), in a circular path, a total of 10 images
- The script should also output camera locations and orientation (in Z axis) along with the frames
Such dataset may help us find out the camera/robot’s location given a test image; not so simple as it sounds ;)
Let’s start with setting up our environment.
- Open the console and launch Blender.
$ blender
-
Start with default project: The default project (create one if you haven’t…) gives you a cube centered at the origin with a Camera and a Light. As discussed in the last part, the object can be replaced with your object of Interest by simply importing its 3D model. For better visualization, I have duplicated the default cube (CTRL+C and CTRL+V) and colored them.
-
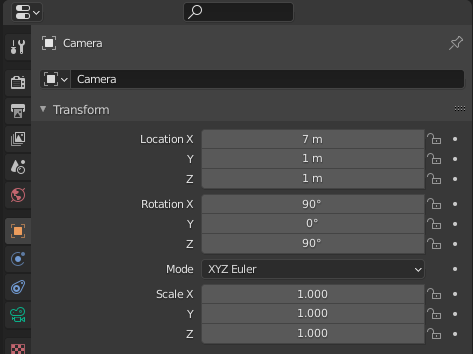
Setup the Camera: We plan to take snaps of the object of Interest (OoI) from various points of the trajectory programmed/desired by us. So, we start with an initial setup for our objects: camera, light and all cube(s). It signifies the initial position of our camera, before it can start capturing anything. The
Object Propertiesfor Camera look like:
- Automate Camera motion using Python script: Let’s first try to understand what are we trying to accomplish here. Here, I am trying to move the camera in a circular trajectory but only till a quadrant; camera starts at the X axis and ends up at the Y-axis.
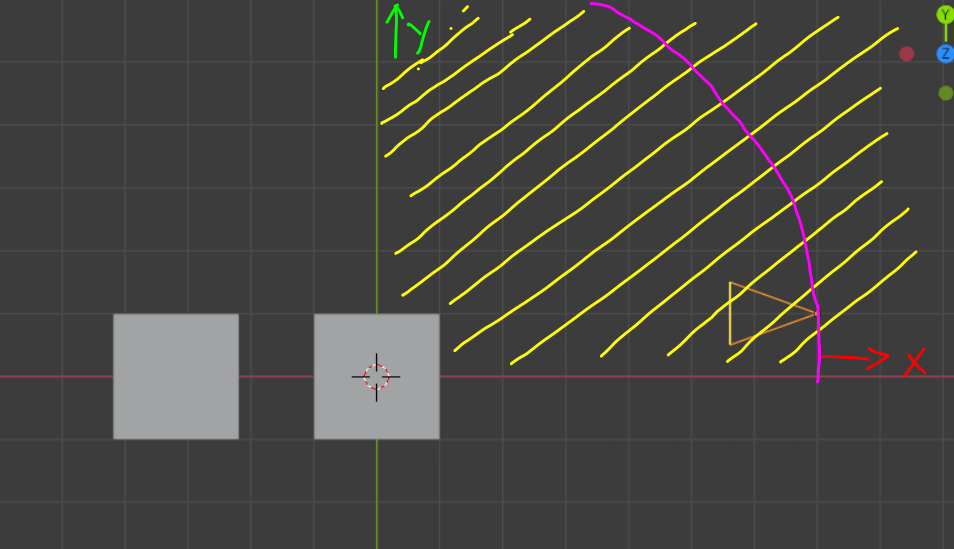
For a particular radius, this trajectory is traversed by shifting the camera in small steps. The smaller the steps (or step-size), the better (and more) the data. The same step is repeated for different distances or better called as radii.
We are familiar with with the fact that the X and Y coordinate in Cartesian coordinate can be replaced with rCos(theta) and rSin(theta) in spherical coordinate system. So, we can first find theta, and for a particular radius (r), we can find x and y. The Setup the Camera section shows the initial camera orientation. The X and Y coordinates have been fixed by us initially. We find the angle made by the camera at this time. Let’s call it init_angle. This is very close to the X axis, as obvious. Now, we need to limit our motion to a maximum of 90 degrees (or a single quadrant). Let’s call it target_angle. Now, while going from init_angle to target_angle, the number of steps to be taken are specified by num_steps_revolution (just because the camera is revoluting about the origin or the first cube). For simplicity, we choose only a single radius for trajectory.
Let’s not change the lights and get to the code.
Import required dependencies:
import bpy
import os
import numpy as np
from math import *
from mathutils import *
Now, we define the locations and names of the objects that we will be needing: the target a.k.a the OoI (object of interest):
#set your own target here
target = bpy.data.objects['Cube'] #Do not forget to check the object name
t_loc_x = target.location.x
t_loc_y = target.location.y
The target object is the one around which we want the camera to face. In our case, its the cube centered at the origin.
cam = bpy.data.objects['Camera']
cam_loc_x = cam.location.x
cam_loc_y = cam.location.y
Now, define the angles and radius.
R = (target.location.xy-cam.location.xy).length # Radius
num_steps_revolution = 36 #how many revolution steps in each circle/revolution
#ugly fix to get the initial angle right
init_angle  = (1-2*bool((cam_loc_y-t_loc_y)<0))*acos((cam_loc_x-t_loc_x)/dist)-2*pi*bool((cam_loc_y-t_loc_y)<0)
target_angle = (pi/2 - init_angle) # How much more to go...
Start looping the camera
for x in range(num_steps_revolution):
    # Use alpha to locate new camera position
    alpha = init_angle + (x+1)*target_angle/num_steps

    # Move camera
    cam.rotation_euler[2] = pi/2+alpha # *Rotate* it to point to the object
    cam.location.x = t_loc_x+cos(alpha)*R
    cam.location.y = t_loc_y+sin(alpha)*R

    # Save Path for renders
    file = os.path.join('/home/renders', x) # saves filename as the step number
    bpy.context.scene.render.filepath = file
    bpy.ops.render.render( write_still=True ) # render
The entire code (with slightly different variable names) can be found here
Running the entire code in a console (as shown in Part 1), should render and save 36 images in the path specified. A sample would be:
$ blender -b ~/Videos/blender/panel-synthetic-dataset.blend -P ~/Videos/blender/test_synthetic.py
To visualise if the camera trajectory will look like, I modified the initial script as follows:
I replaced the render part with camera generation. Thanks to this wonderful BlenderExchange Site As we increase the angle, progressing from initial angle init_angle to target angle target_angle, at each step, instead of rendering, I ask Blender to place a new camera at the newly calculated position. The result is as follows:
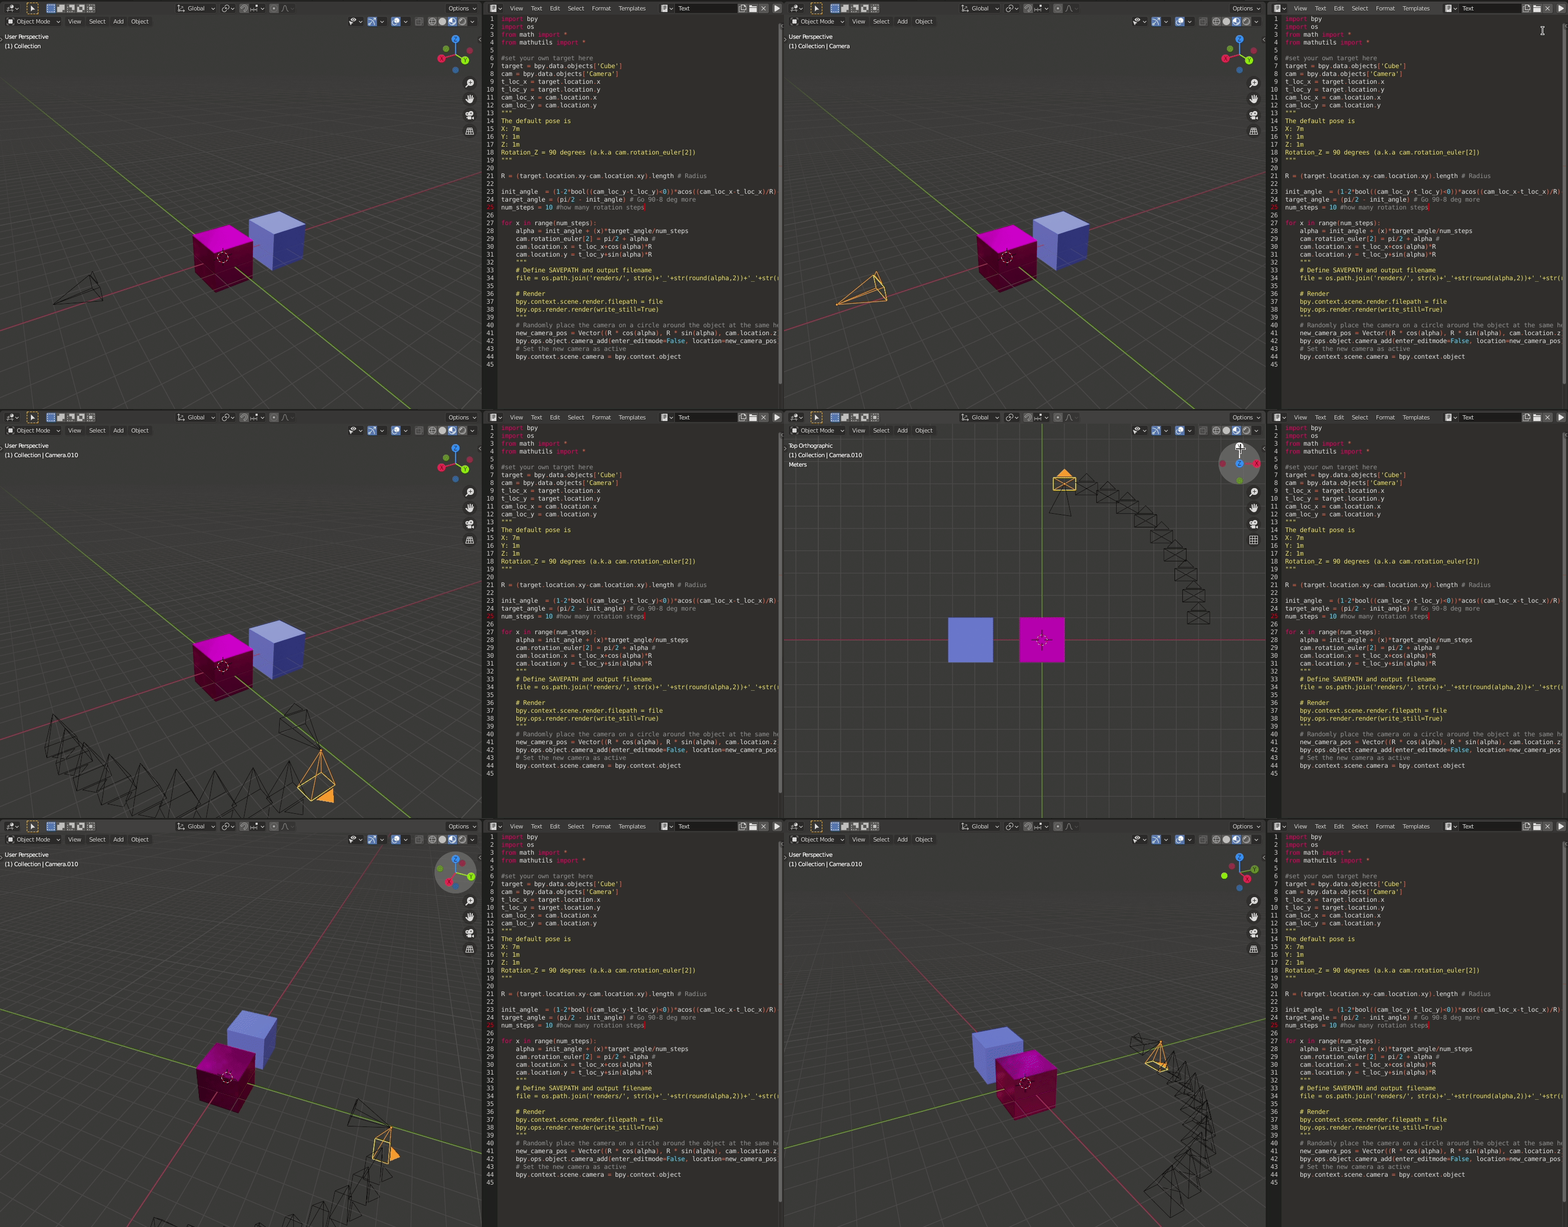
The blend file can be used for reference here: 10cams.blend
Except for the new cameras all facing towards negative Z axis, as it doesn’t affect our purpose, everything looks Good :)
A Step further:
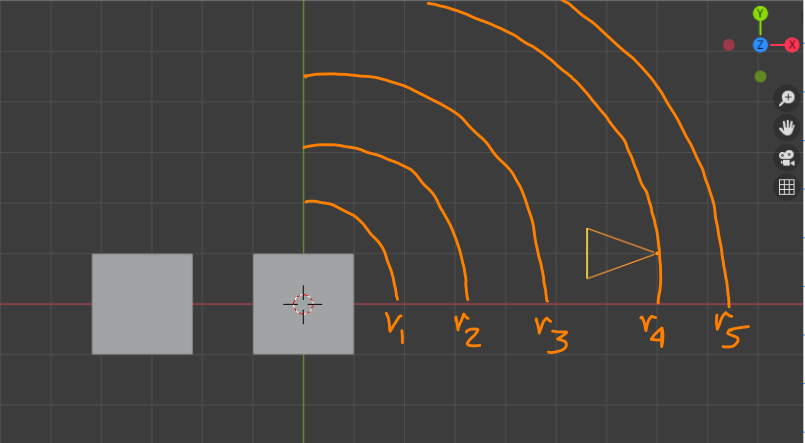
This seemed very simplistic but great to understand how to get the job started. I used an upgraded version of the code, to give me even more data: I added rotation to revolution. Till now, our camera shifted to a new position in the same circular trajectory and took a snapshot and moved ahead. But now, we ask it to take even more snaps at the same exact spot, by rotating about itself. Further, I ask it to not only follow a single radius, but a range of radii; we need to specify the radii (r1, r2,…) for getting closer or farther from the object. This modified script can also be found here:
# Run blender -b ~/Videos/blender/panel-synthetic-dataset.blend -P ~/Videos/blender/test_synthetic.py
"""
The default pose is
X: -7m
Y: -1m
Z: 1m
Rotation_X = 90 degrees
Rotation_Z = -90 degrees (a.k.a cam.rotation_euler[2])
"""
import bpy
import os
import numpy as np
from math import *
from mathutils import *

#set your own target here
target = bpy.data.objects['Shape_IndexedFaceSet.018']
cam = bpy.data.objects['Camera']
t_loc_x = target.location.x
t_loc_y = target.location.y
cam_loc_x = cam.location.x
cam_loc_y = cam.location.y
# The different radii range
radius_range = range(7,15)

R = (target.location.xy-cam.location.xy).length # Radius

num_steps_revolution = 10 #how many revolution steps in each circle/revolution
num_steps_rotation = 5 #how many rotation steps at each angle
rotation_range_limit = 3 # NOTE ! in degrees
init_angle = atan(cam_loc_y/cam_loc_x) #in rad
init_angle = init_angle + pi # as in 3rd quadrant
target_angle = (1.5*pi -pi/6.0 - init_angle) # Go 270-8 deg more (pi/6 or 30deg removed as no suitable frame can be found there

for r in radius_range:
    for x in range(1, num_steps_revolution):
        alpha = init_angle + (x)*target_angle/num_steps_revolution
        lim_min = degrees(alpha)-rotation_range_limit #degrees
        lim_max = degrees(alpha)+rotation_range_limit #degrees
        offset = 1.0/num_steps_rotation #degrees
        for dalpha in np.arange(lim_min, lim_max, offset):
            #print(f'in r:{r}, and alpha: {alpha}, dalpha:{dalpha}')
            print(r)
            cam.rotation_euler[2] = pi/2 + radians(dalpha) #
            """
            Use alpha to locate new camera position
            Use dalpha to rotate it at the obtained position to get more frames
            """
            cam.location.x = t_loc_x+cos(alpha)*r
            cam.location.y = t_loc_y+sin(alpha)*r

            # Define SAVEPATH and output filename
            file = os.path.join('renders/', str(r)+'_'+str(round(dalpha-180,3))+'_'+str(round(cam.location.x, 3))+'_'+str(round(cam.location.y, 3))) #dalpha in degrees

            # Render
            bpy.context.scene.render.filepath = file
            bpy.ops.render.render(write_still=True)
            """
            # Place Dummy Cameras to visualise all potential calculated positions
            dalpha = radians(dalpha)
            # Randomly place the camera on a circle around the object at the same height as the main camera
            new_camera_pos = Vector((r * cos(dalpha), r * sin(dalpha), cam.location.z))
            bpy.ops.object.camera_add(enter_editmode=False, location=new_camera_pos)
            # Set the new camera as active
            bpy.context.scene.camera = bpy.context.object
            """
This script performs similar camera motions with rotation+revolutions and saves the camera data (location, orientation) as the file name. The process took a minimum of 5 hours on my non-GPU system and generated more thatn two thousand images


The memory consumption was as follows:
